
Using Nitrokey 3c for SSH Authentication
The code for this project is located on my Github: nitrokey-ssh-gpg
Background
If you want a mobile and more secure way to manage your SSH and GPG keys, one route you can take is leveraging hardware keys. The Nitrokey 3C acts as an MFA device, but it also has the ability to store keys commonly used for SSH authentication. One of the main benefits of storing your private keys on a secure hardware device is they’re never loaded into your computer’s RAM. The cryptographic operations are performed on the device’s firmware itself, meaning you’re protected from any malware attacks that could attempt to steal your private keys.
All of Nitrokey’s products are open-source and the Nitrokey 3C has firmware written in Rust. I have FIDO2 which I use for MFA for website logins and the 3C which is their newer product line that I received not too long ago. This is what I will be using for this blog post, though this guide should work for most other OpenPGP compatible hardware devices since we’re just using OpenGP.
The latest firmware at the time of this writing is v1.5.0 and it supports everything you need to use the keys stored on the device to SSH into Linux servers.
Prerequestites
- Nitrokey 3c
- Firmware v.1.5.0 or higher
- GPG v2.2.6 or higher
Creating Keys
If you already have keys, you can skip this section.
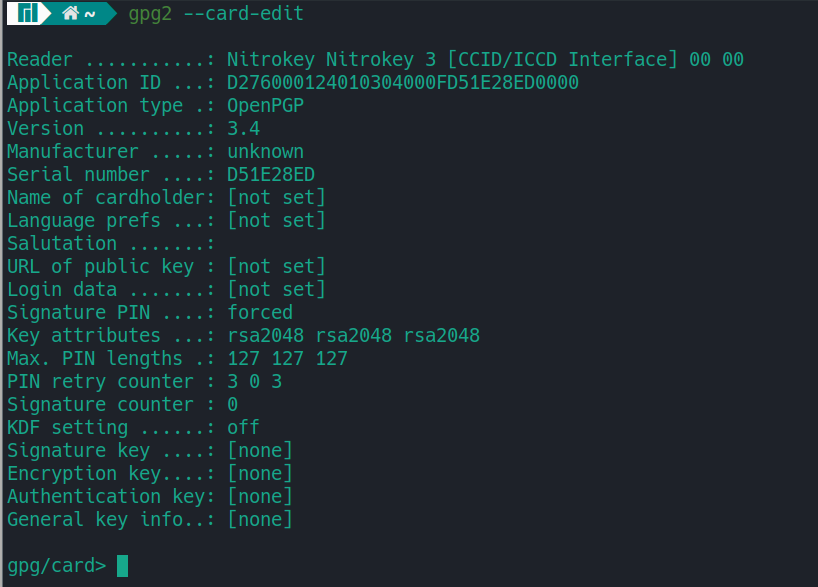
Run gpg2 --card-status to make sure your NitroKey shows up. If it doesn’t you may need to add the udev rules found in the Troubleshooting section of this post.
Run gpg2 --card-edit which will put you to the gpg prompt
Enter admin, then enter generate
It will ask you for the Admin PIN (default: 12345678), then ask for the PIN (default: 123456).
When it asks you to make an off-card backup of the encryption key, note it will only backup the encryption key, and not the whole key set. So the best option is to select No. If you want to make a full backup, follow these instructions.
Afterward, it will take some time, but it will generate the whole key set (Signature Key, Encryption Key, Authentication Key)
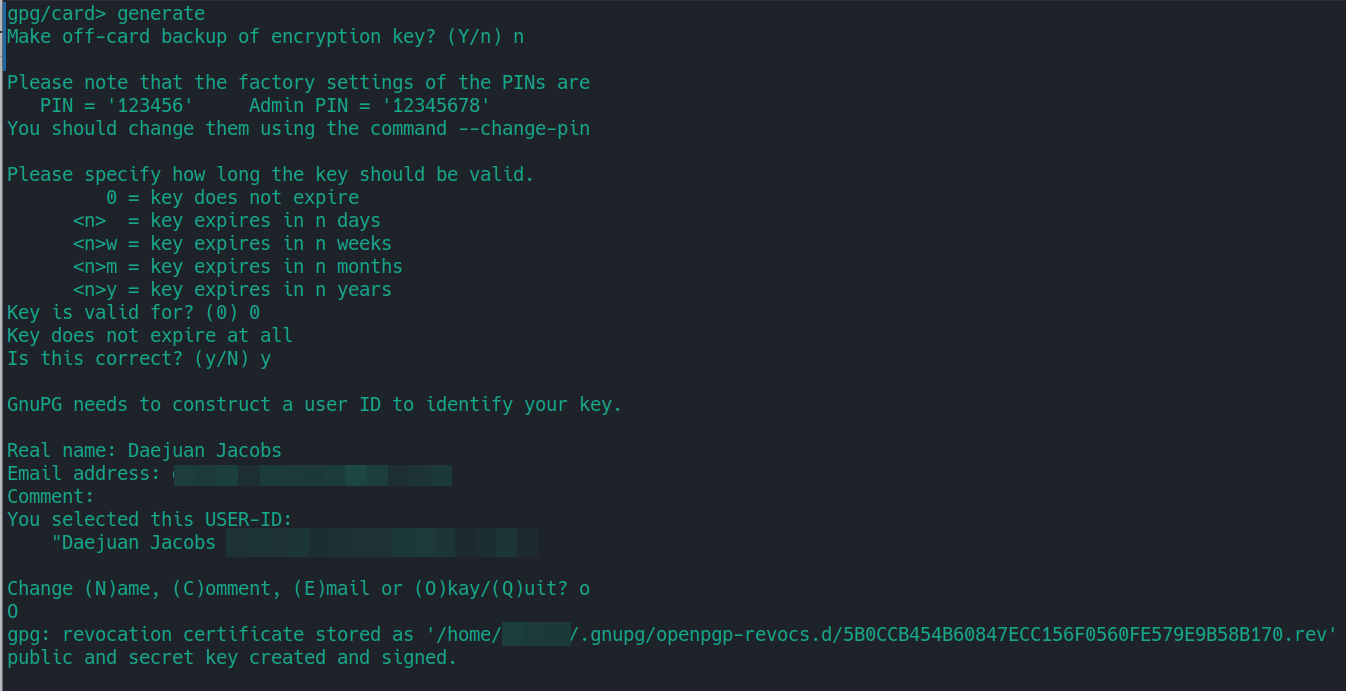
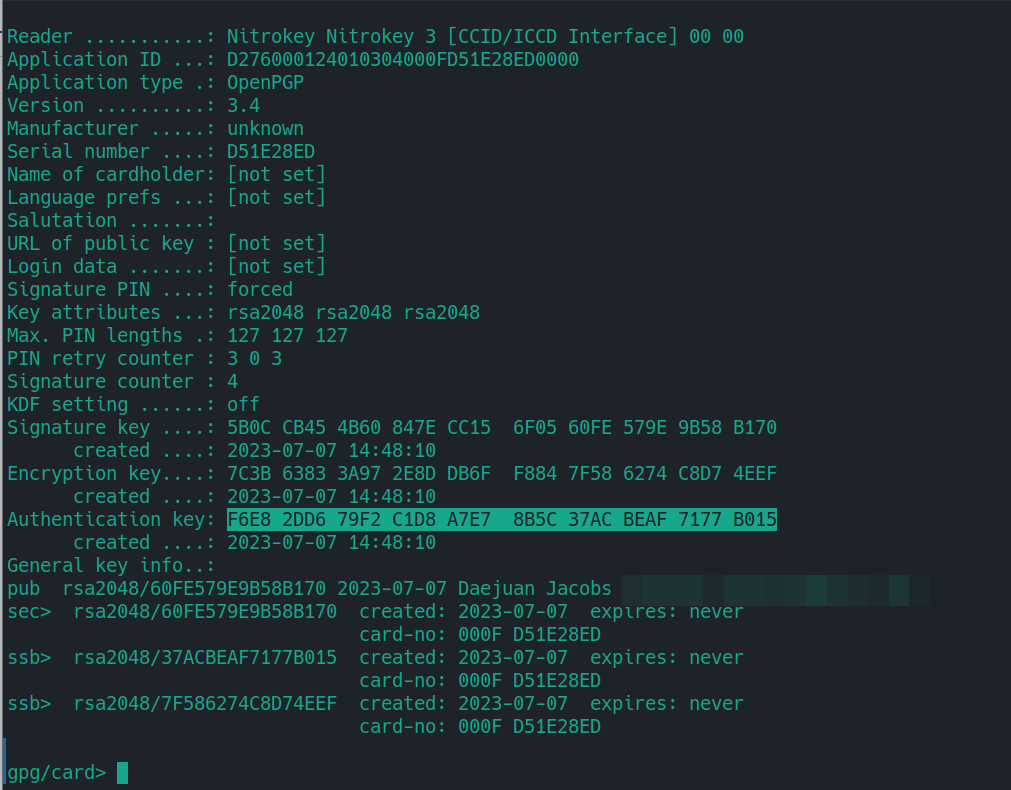
Note the “Authentication key”, as this is the key that will be used for the Linux server.
Copy Authentication Public key
Export the public key in ssh format. I like to place it in the .ssh folder so I can copy it to servers later.
gpg2 --export-ssh-key AUTH_KEY_ID > ~/.ssh/nitrossh.pub
You can use ssh-copy-id to send it to the server under the user you want to access.
ssh-copy-id -f -i ~/.ssh/nitrossh.pub -o 'IdentityFile test123.pem' youruser@example.net
Alternative
If you need to use a server key not in a keyring, such as the case with AWS EC2 nodes by default, use the -o flag and set the “IdentityFile” to the key you currently use to login
ssh-copy-id -f -i ~/.ssh/nitrossh.pub -o 'IdentityFile test123.pem' ec2-user@ec2-34-333-22-11.compute-1.amazonaws.com
Load Agent
Next you need to setup the GPG agent to interact with your SSH agent. There are a few configuration files that need to be in play, so I’ve created a GitHub repository with them.
Make sure you have an instance of ssh-agent running in your current terminal/shell.
eval $(ssh-agent)
You can source the bash file that sets the gpgagent environment variables and configuration required.
source nitrokey.sh
Logging in
Afterward, you should see the Authentication key stored on the Nitrokey loaded into the SSH agent.
ssh-add -L
You should see something like the following:
ssh-rsa LONGKEYHERE cardno:000F D51E28ED
You should be able to login to the server
Troubleshooting
GPG Agent cannot see card
If executing gpg2 --card-edit or gpg2 --card-status as a non-privileged user gives an error that the card cannot be found or opened. It is likely that the daemon responsible for handling smart cards is not running.
If you are using PC Smart Card Daemon, make sure it’s running.
systemctl status pcscd.service
The Arch documentation has good information on this issue